Set up your property in 8 steps

From the activation link to your first certificate. The set-up takes about 30 minutes; after that your team trains on their own phones.

The 8 steps in 2 minutes (video with captions)

Before you start, have this ready

  • The activation link HGA sent you. It looks like …/login?code=XXXXX-XXXXX.
  • Your logo as a web address (https://…, PNG or JPG). If you only have the file, send it to HGA and we add it with you during the set-up session.
  • The list of your departments and the name of each head of department.
  • For the procedures: how staff report a fault, your linen policy, and who the duty manager is.

Step 1 · 2 minutes

Create your account

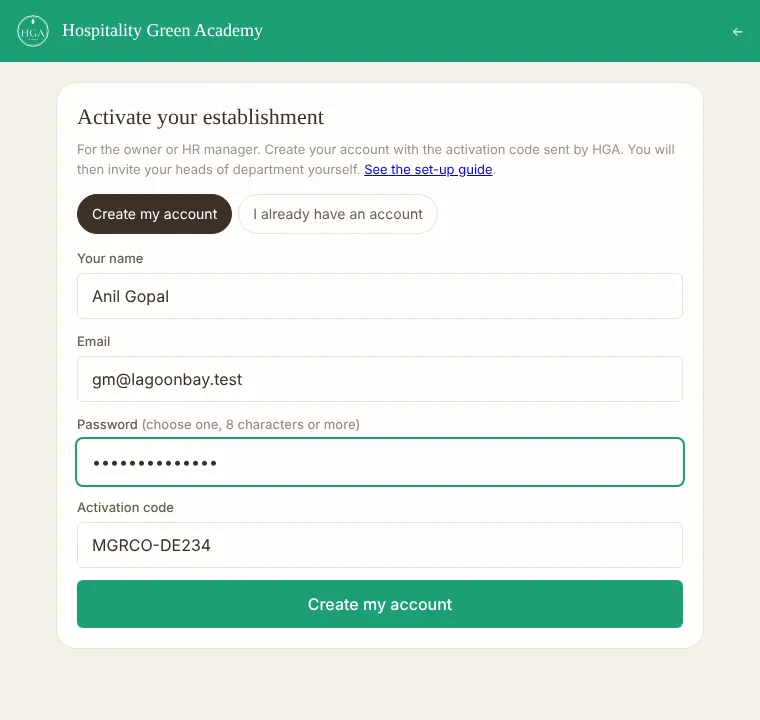
  1. Open the activation link from HGA.
  2. Enter your name, your email and a password of 8 characters or more. The activation code is already filled in.
  3. Click Create my account.
  4. If a message asks you to confirm your email, open that email and click the link.

Result You arrive on your dashboard. Your level is Owner / HR: you see and manage everything.

The page where the owner creates an account with the activation code

Step 2 · 5 minutes

Add your logo, colour and departments

Where Tab Branding

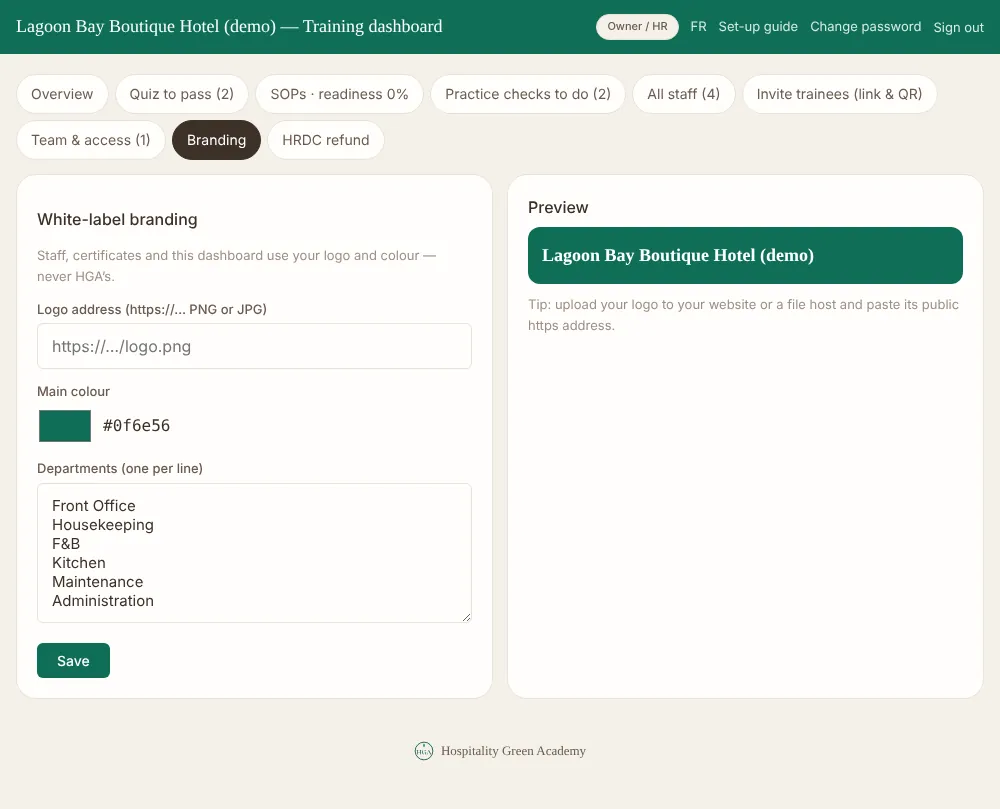
  1. Paste the web address of your logo.
  2. Choose your main colour.
  3. List your departments, one per line. Staff choose from this list, and each supervisor is attached to one or more of them.
  4. Click Save and check the preview on the right.

Result Staff pages, certificates and the dashboard carry your brand, not HGA’s.

The Branding tab with logo address, colour and departments

Step 3 · 5 minutes

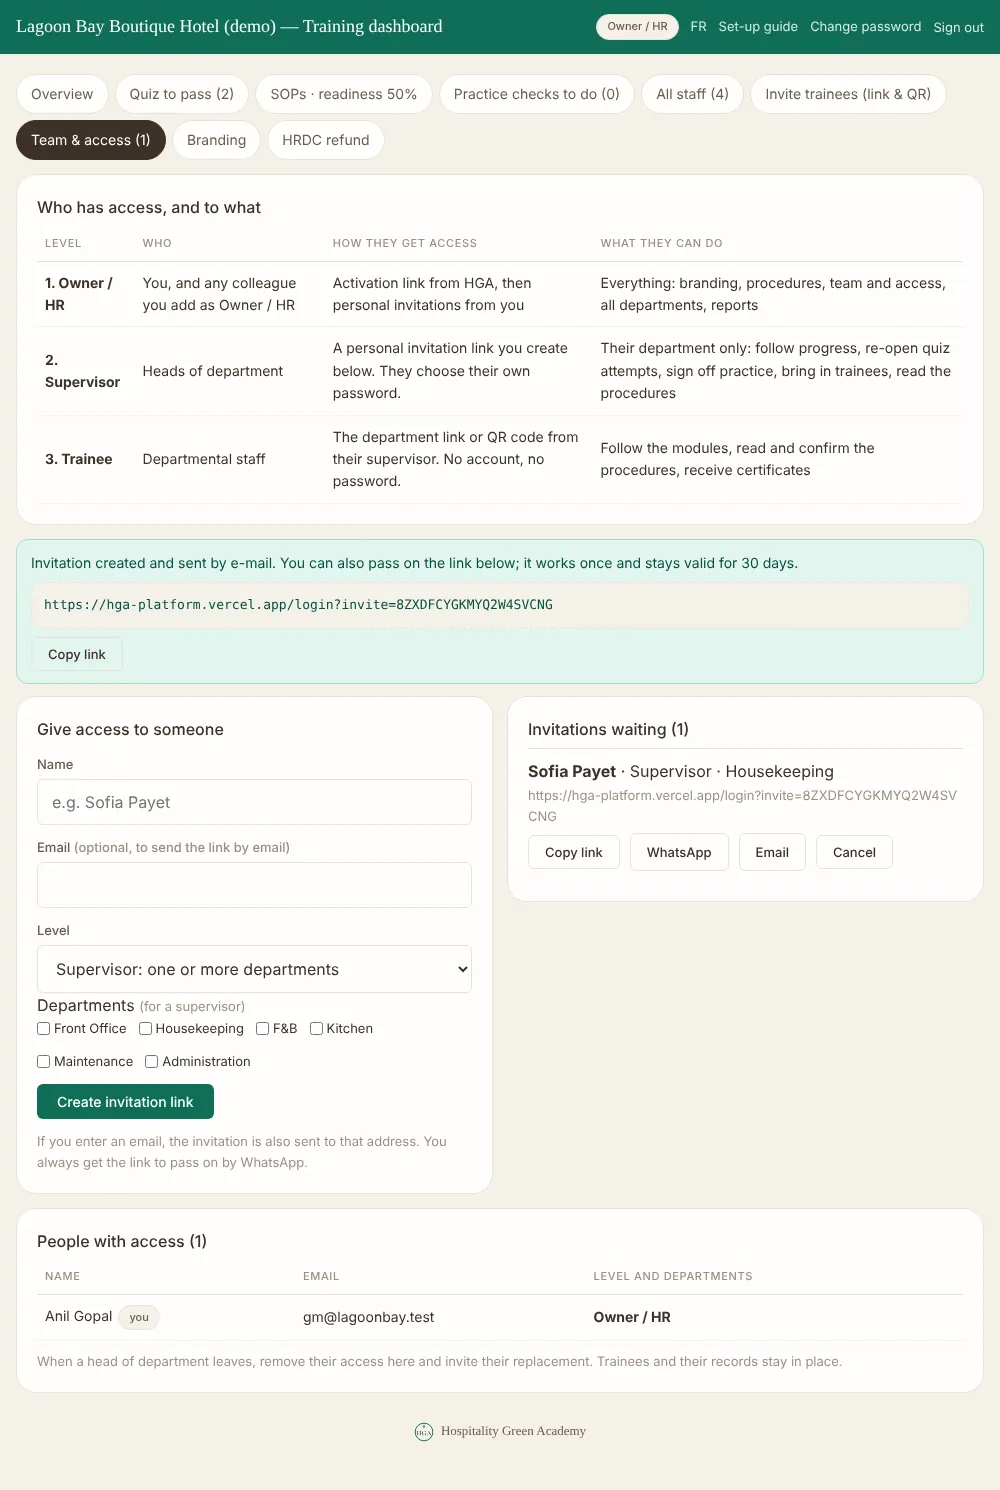
Give access to your heads of department

Where Tab Team & access

  1. Under Give access to someone, enter the person’s name and, if you wish, their email.
  2. Keep the level Supervisor and tick their department or departments.
  3. Click Create invitation link.
  4. The link appears on screen: send it by WhatsApp or email. If you entered an email address, the invitation is also e-mailed once e-mail sending is switched on for your property.

Result Each head of department chooses a password and sees only their own department. A link works once and stays valid for 30 days.

Tip To give a colleague the same full access as you, choose the level Owner / HR.

The Team & access tab with the three levels and a new invitation link

Step 4 · 10 minutes

Adopt your first procedures

Where Tab SOPs

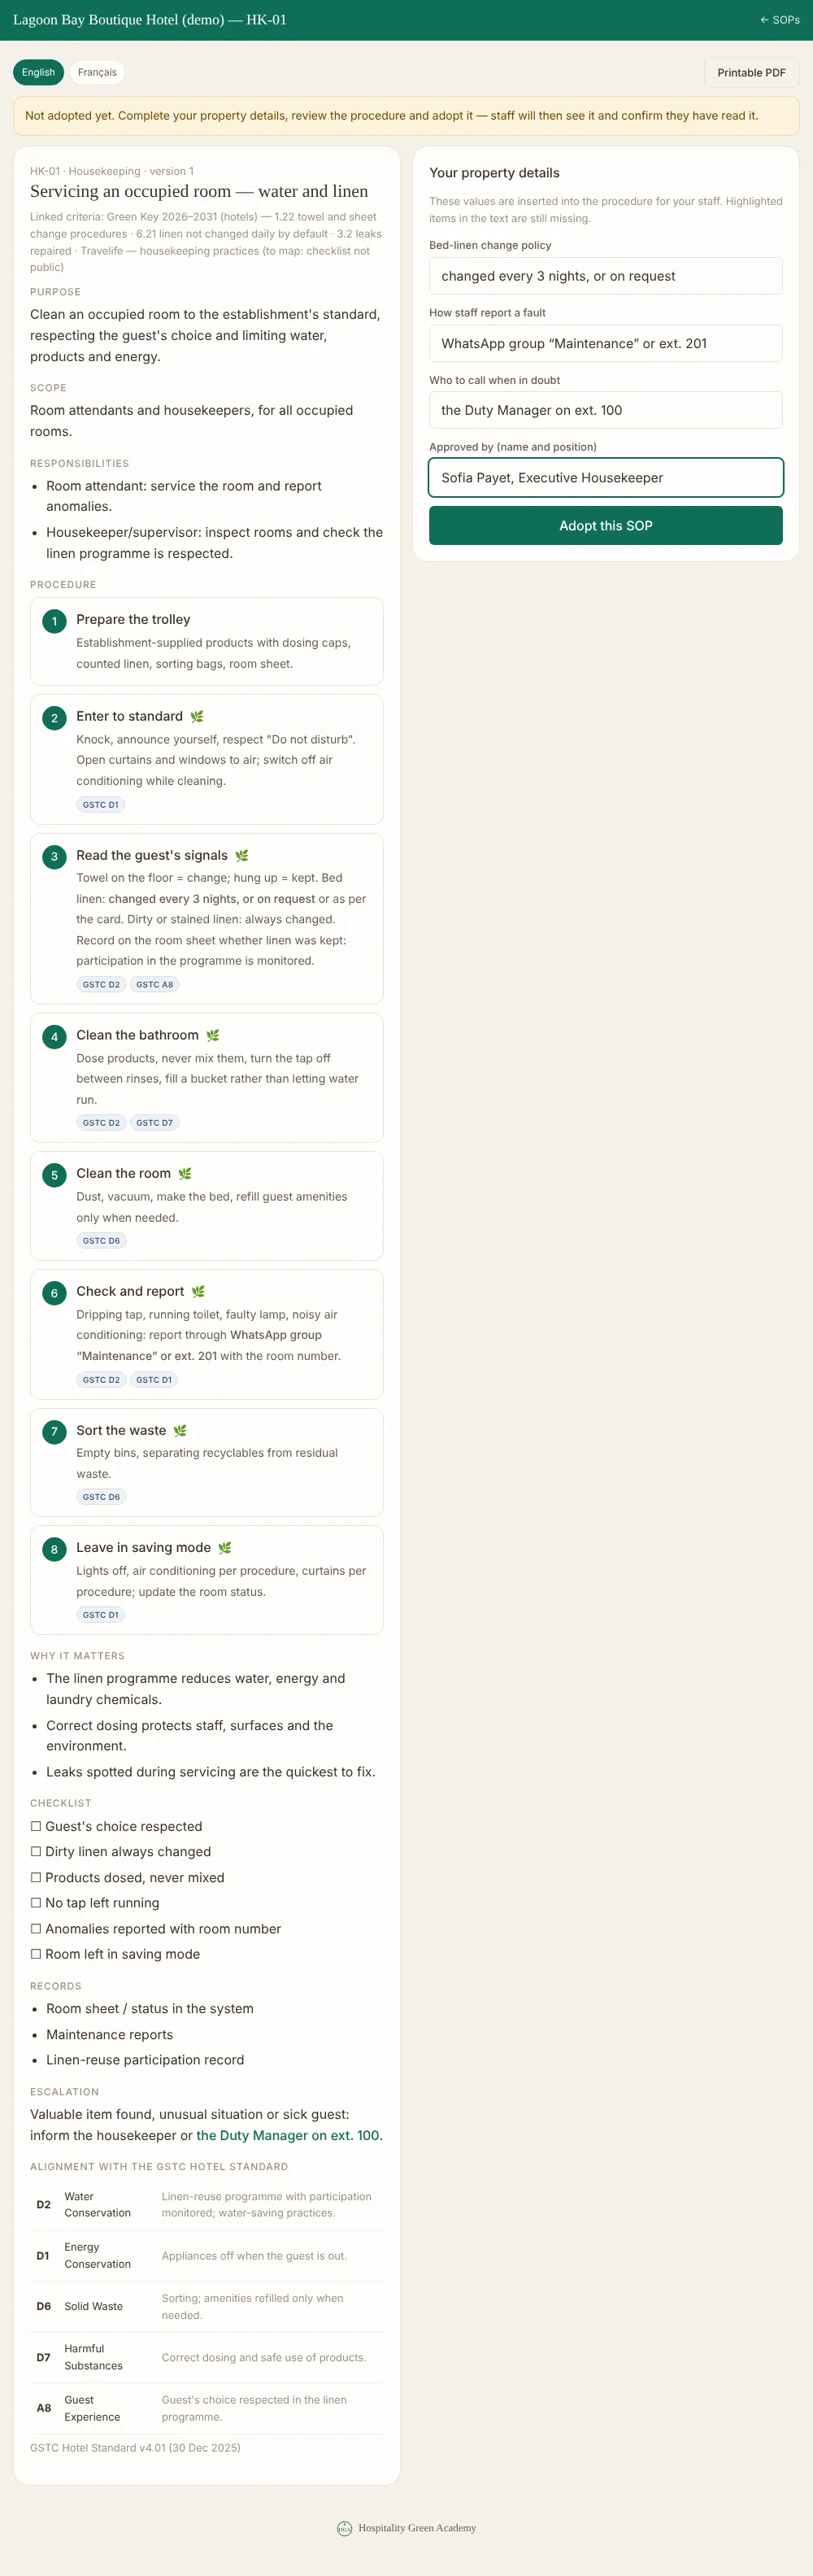
  1. Choose a procedure and click Review & adopt.
  2. Read it, then fill in Your property details: how to report a fault, your linen policy, the duty manager.
  3. Enter the name of the person who approves it and click Adopt this SOP.

Result The procedure now shows your own details. Staff can read and confirm it, and it counts in your readiness score.

Tip Start with the procedures that have a training module: your staff are trained and checked on those.

A procedure with the property’s own details filled in before adoption

Step 5 · 5 minutes

Bring in your staff

Where Tab Invite (link & QR)

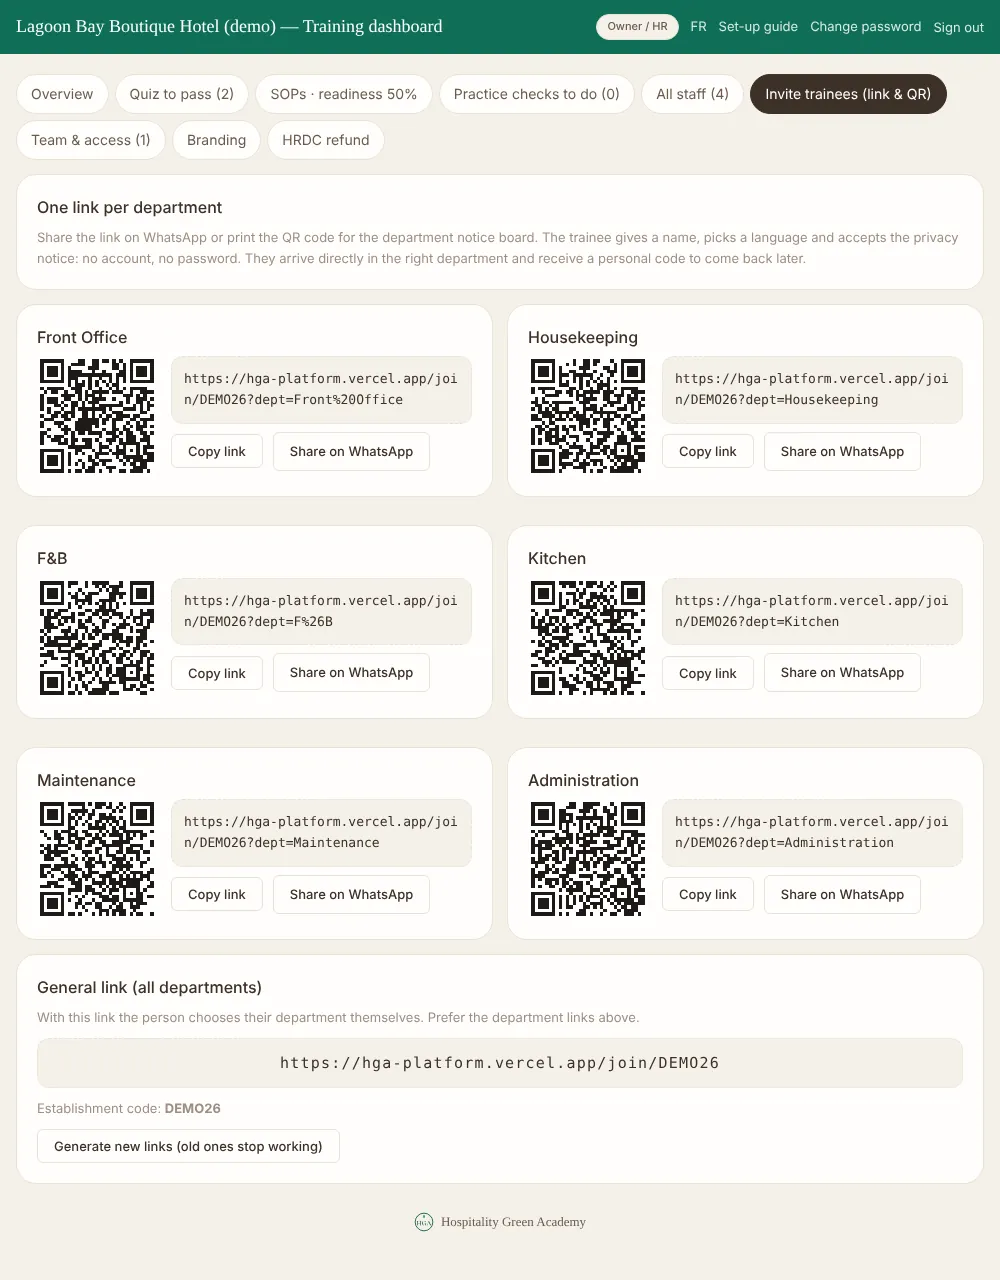
  1. Each department has its own link and QR code.
  2. Click Share on WhatsApp, or print the QR code for the staff notice board.
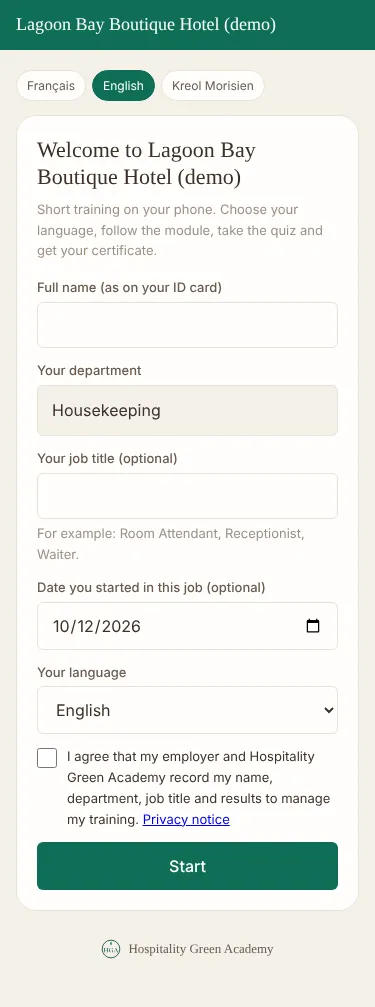
  3. The employee enters their full name as on the ID card, their job title and start date, picks a language (English or French) and accepts the privacy notice. No account, no password.
  4. If you plan HRDC refund claims, open Staff → Staff details and enter each person’s national ID number once, from your HR file (or paste the list from Excel). Staff never type it themselves; only you see it, and it fills the HRDC packs automatically.

Result They arrive in the right department and receive a personal code to come back later.

Tip Your supervisors have the same tab for their own department, so they can do this step themselves.

The Invite tab with one link and QR code per departmentWhat the employee sees on a phone after scanning the QR code

Step 6 · A minute a day

Follow the training

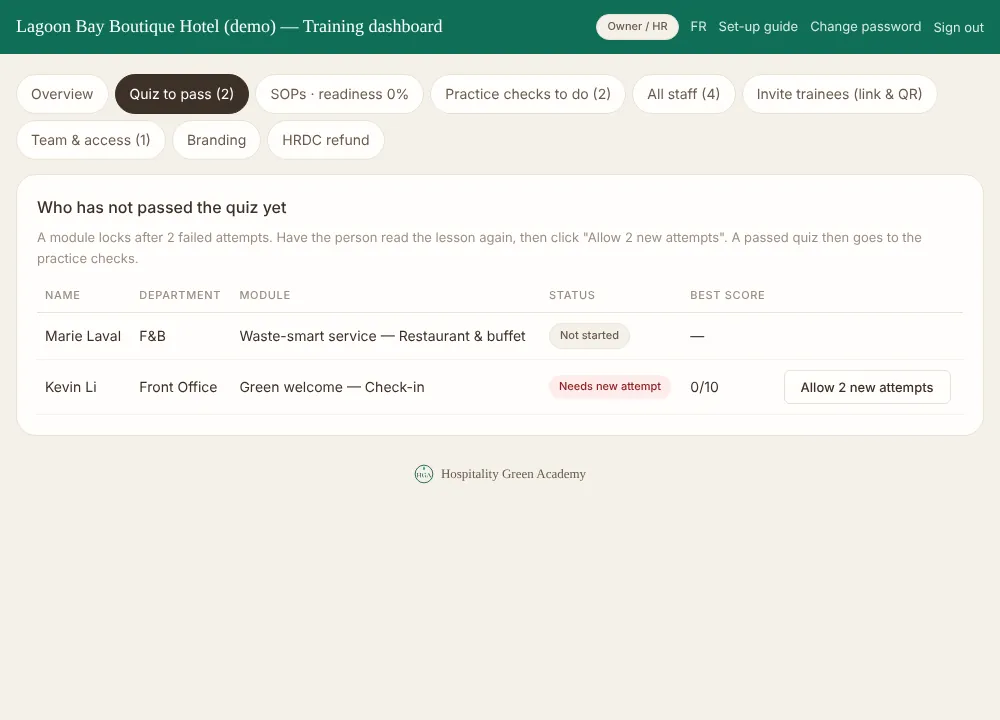
Where Tab Quiz to pass

  1. A module takes 15 to 20 minutes on a phone. The quiz has 10 questions and is passed with 7 correct answers.
  2. This tab lists everyone who has not passed yet.
  3. After two failed attempts the module locks. The supervisor (or you) makes sure the person goes through the lesson again, then clicks Allow 2 new attempts.

Result You know at any moment who is trained and who is not.

The list of staff who have not yet passed a module

Step 7 · 15–20 minutes per person, once a week

Check the practice and issue the certificate

Where Tab Practice checks to do

  1. Passing the quiz does not give a certificate yet.
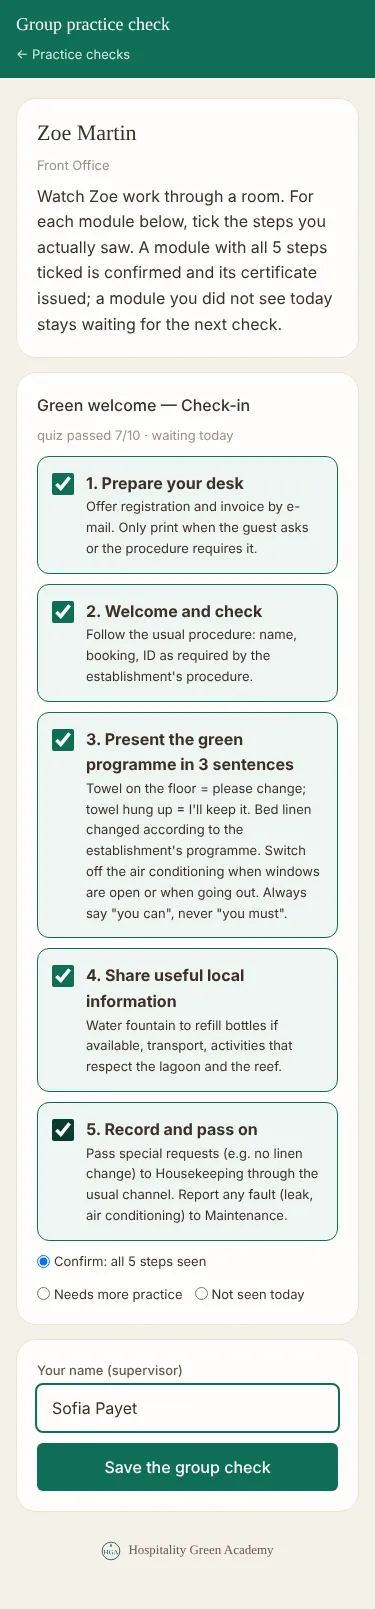
  2. Checks are grouped: once a week (for a new Room Attendant, at the end of weeks 1, 3 and 4), the supervisor clicks Group check next to the employee’s name and watches them work through a room.
  3. On the phone, every module passed since the last check is listed with its 5 steps. Tick the steps you see. A module with all 5 ticked is set to Confirm; choose Needs more practice with a short note if needed; leave Not seen today for a module to check next time. Then click Save the group check.
  4. No module should wait more than 14 days after its quiz. A trainee waiting longer is shown in red, and the overview lists it under To do now. Open check next to a single module still works for a one-off check.

Result The certificate is issued at that moment, with the supervisor’s name on it. The employee can open and download it.
The group practice check on a supervisor’s phone, with the steps of each module ticked

Step 8 · 2 minutes

Keep the evidence

Where Tab Overview

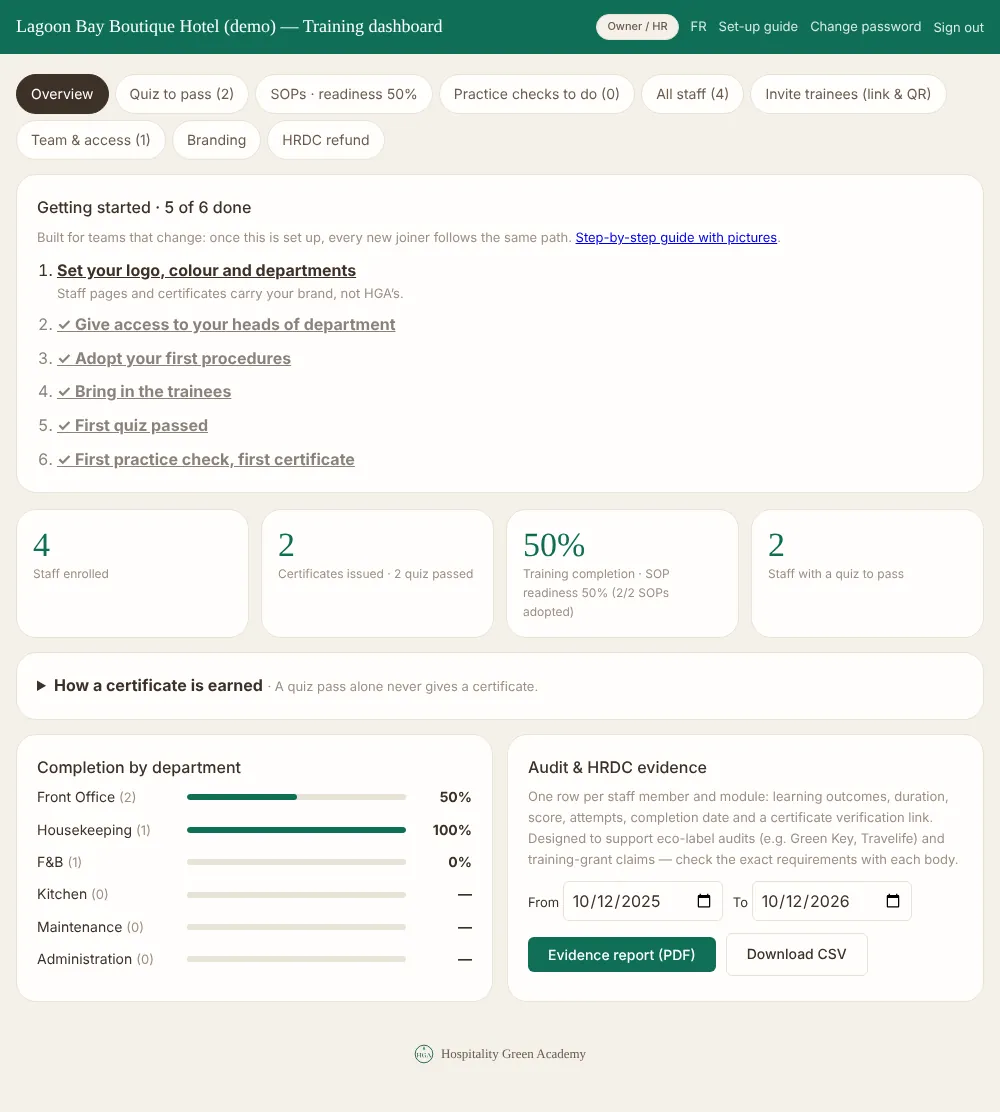
  1. Under Audit & HRDC evidence, choose the dates and click Evidence report (PDF).
  2. Download CSV gives the same records for a spreadsheet.

Result One document shows who was trained, on which version of each module, and who verified the practice. It is designed to support eco-label audits and training-grant claims; check the exact requirements with each body.

The Overview tab with the getting-started list, the key figures and the evidence report

After the set-up

A new employee joins

Share the department link or QR code. They follow the same path as everyone else.

Someone leaves

Tab All staff, button Left the job. Their access stops and their training records are kept.

A head of department changes

Tab Team & access, button Remove access, then create an invitation for the new person.

A link was shared outside your team

Tab Invite (link & QR), button Generate new links. Staff already registered keep their access.

If something does not work

I forgot my password.

On the sign-in page, click Forgot your password?, enter your email and open the link on the same phone or computer. Once signed in, Change password is at the top of the dashboard.

The invitation link does not work.

A link works once and for 30 days. Create a new one in Team & access; you can cancel the old one under Invitations waiting.

An employee changed phone.

They open …/resume on the new phone and enter their personal code (10 characters). The code is shown on their training home page.

An employee lost their personal code.

They join again with the department link. Then mark the old entry Left the job so that the person is not counted twice. Certificates already issued stay on record under the old entry.

My logo does not appear.

The address must start with https:// and open the image itself when you paste it in a browser.

Can the dashboard be in French?

Yes: click FR at the top of the dashboard; click EN to switch back. The lessons, quizzes and certificates for staff are in English and French.

Prefer to do it together?

HGA runs the set-up with you in one session.

Contact HGA

← Back to the website